After installing FacePoseApp on your device,
there are a few steps to take:
-
Create a secure position for your device.
Maybe you already have some kind of 'stand' for your device, or
you are able to create a stand DIY style. FacePoseApp works in
both portrait and landscape mode;
-
Provide good lighting. Indirect frontal
light works best. Avoid Neon light (according to Visage);
-
Connect your device to the wifi, which is
connected to the same network (LAN) as your gaming PC. The
connection is made using the Wifi configuration of your
smartphone.
-
Configure communication. Open the Settings page of FacePoseApp (see
below) and enter the IP-address of your gaming PC.
The 'test-ping' button helps you test the connection. On your
PC, you can use the Windows command 'ipconfig /all' in a command
window to find the IP-address. If you have
FaceTrackNoIR and you
open the
OSC-tracker settings dialog, that shows the local
IP-addresses for you.
-
Test the tracker and
communication. Start the face-tracker on the Main page,
using the 'play' button. If all is well, the tracker
will show the status "OK" and the POSE indicator will change. In
FaceTrackNoIR, the OSC-tracker changes its 'icon' when it
receives messages from FacePoseApp. If you have upgraded, then
the face-pose will be shown in FaceTrackNoIR.
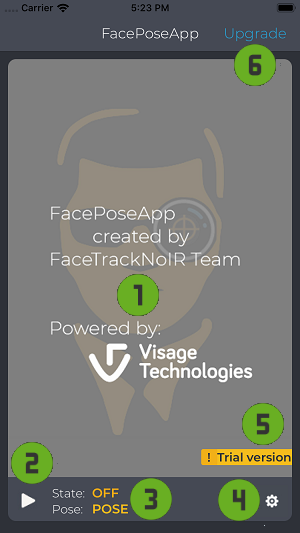
Main page
The main page contains a few important items:
- 1: Video-window. This will show your face after pressing
'play';
- 2: 'Play/Pause' button;
- 3: Status and pose indicators;
- 4: Settings button (this opens the Settings page);
- 5: Warning indicator;
- 6: Upgrade button (this opens the Upgrade page);
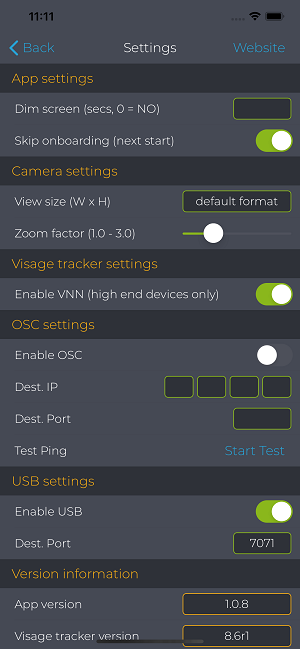
Settings page
The settings for FacePoseApp are kept as simple as possible.
Still, we describe them here:
App Settings
- Dim screen. When gaming you may not want to
be distracted by your own image all the time. If you set a time
here, the screen will appear 'dimmed' after that time. Tapping
the sceen will reset the 'dim'.
- Skip onboarding (iOS only). If you want to
see the onboarding pages again on next startup of FacePoseApp,
set the switch to OFF.
Camera Settings
- Whitebalance (Android only). The listbox
shows all modes supported by your device. Select the whitebalance mode that
best fits your conditions.
- Frames/sec (Android only). The listbox
shows all modes supported by your device. Select the mode that yields the best result.
- View size. The listbox shows all modes supported by
your device. For iOS this setting only works with iOS 13 and up.
A lower setting usually means higher fps, but possibly less
accurate tracking.
- Zoom factor. Use zoom, if the distance
between you and the device becomes too large.
Visage Tracker Settings
- Enable VNN. The Visage tracker supports an
experimental Neural network, which should provide more stable
tracking results. Only use this on high end devices, because it
requires considerable CPU power.
OSC Settings
- Enable OSC. Turn OSC communication ON or
OFF.
- Dest. IP. The IP-address of your gaming PC.
Determine this by using 'ipconfig /all' on your PC or by opening
the OSC-tracker settings page of FaceTrackNoIR.
- Dest. Port. The port number of the
destination. This is the port that you define in the OSC server
(preferable the OSC-tracker of FaceTrackNoIR)
- Test Ping. Press this button to send 'ping'
messages to the configured IP-address and so test the
connection. You will be notified of the result by a popup (iOS)
or a colour-change of the button (Android).
USB Settings
- Enable USB. Turn USB communication ON or
OFF.
- Dest. Port. The port used for USB
communication. The port-setting should match the setting of the
USB tracker plugin.
Please check out the specific USB pages
for Android and
for iOS.
Version Info
- App version. The version of FacePoseApp.
- Visage tracker version. The version of the Visage SDK used. This info is only up-to-date when the tracker has
at least been started once.
The 'website/info' button in the top bar opens a new page,
showing this website.